
Rough Plumbing For Rear Discharge Toilet; Complete Guide
Getting your bathroom set up just right starts with the plumbing hidden behind the walls. In this article, we’ll walk you through the important steps of setting up the plumbing for a rear discharge toilet. These toilets save space and have unique plumbing needs. We’ll explain everything in easy-to-understand terms, from measuring and installing pipes to making sure your toilet works perfectly.
Whether you’re a DIY enthusiast or tackling a home renovation, this guide will help you get your rear discharge toilet up and running smoothly.
Table of Contents
What is the plumbing rough-in for a toilet?
The plumbing rough-in for a toilet involves the installation of the necessary pipes and connections to prepare for the toilet’s fixture. This includes creating a drain opening for waste removal, setting the toilet flange at the correct height, and connecting it to the sewer or septic system.
The rough-in also involves positioning the water supply pipe, usually a 1/2-inch copper or plastic line, at a designated distance from the wall. The rough-in phase ensures proper alignment and connections for efficient toilet operation. After rough-in, the toilet can be securely mounted, and the final plumbing connections, like water supply and sealing, can be completed.
Rear outlet toilet vs Standard; Full comparison
Certainly, here’s a comparison table and descriptions comparing rear outlet toilets and standard floor-mounted toilets:
| Aspect | Rear Outlet Toilet | Standard Floor-Mounted Toilet |
|---|---|---|
| Installation | Wall-mounted with rear discharge | Floor-mounted with floor drain |
| Space Efficiency | Ideal for small bathrooms | Requires more floor space |
| Appearance | Conceals tank and plumbing | Visible tank and plumbing |
| Plumbing Complexity | Requires specialized plumbing | Standard plumbing configuration |
| Flush Mechanism | Often dual flush for water-saving | Various flush options available |
| Accessibility | May be challenging for some users | Easily accessible for most users |
| Maintenance | May require wall access for repairs | Easier access for maintenance |
| Noise Level | Can be quieter due to concealed tank | Audible tank refill noise |
| Cost | Can be more expensive upfront | A wide range of price options |
| Design Options | Limited design variety | Wide range of design options |
Rear Outlet Toilet
- A rear outlet toilet is a wall-mounted fixture with the plumbing concealed within the wall.
- Ideal for bathrooms with limited floor space, as it saves space by having no visible tank or floor drain.
- Often installed in small bathrooms, commercial spaces, or where aesthetics and space efficiency are important.
- Requires specialized plumbing due to its unique rear discharge system.
- May be quieter in operation as the tank is concealed within the wall.
- Maintenance and repairs may require wall access, making them potentially more complex and costly.
Propress Fitting Failures: Understanding Causes and Prevention
plumbinsight.com
Standard Floor-Mounted Toilet
- A standard floor-mounted toilet is the traditional, common toilet fixture found in most homes and commercial spaces.
- It is installed on the bathroom floor and has a visible tank and plumbing.
- Offers a wide variety of design options and styles to match different bathroom aesthetics.
- Utilizes standard plumbing configurations, making installation and maintenance straightforward.
- Easily accessible for maintenance and repairs without the need to open walls.
- Available in a wide range of price points, from basic models to high-end designs.
The choice between a rear outlet toilet and a standard floor-mounted toilet depends on factors such as bathroom space, design preferences, plumbing capabilities, and budget constraints. Both types of toilets have their advantages and considerations, and selecting the right one will depend on your specific needs and priorities.
What are the rear discharge toilet problems?
Rear discharge toilets, also known as wall-mounted toilets or rear outlet toilets, are known for their space-saving design and unique drainage system. While they offer several advantages, they can also come with specific problems and challenges:
- Installation Complexity: Rear discharge toilets require a specific plumbing setup, which can be more complex to install compared to standard floor-mounted toilets. This can lead to higher installation costs and may require professional plumbing expertise.
- Limited Design Options: There are fewer design and style options available for rear discharge toilets compared to traditional toilets. Finding a rear discharge toilet that matches your bathroom aesthetics can be challenging.
- Maintenance Access: Since the tank is typically concealed within the wall, accessing and servicing the internal components can be difficult. Repairs or maintenance may require opening up the wall, which can be costly and inconvenient.
- Clogging: While rear discharge toilets are designed to handle waste efficiently, they can still experience clogs. Clogs may occur if improper items are flushed, or if the drain line becomes obstructed.
- Cost: Rear discharge toilets can be more expensive than standard toilets due to their specialized design and installation requirements. This cost factor should be considered when planning a bathroom renovation or installation.
- Limited Availability: Rear discharge toilets may not be as readily available as traditional toilets in some regions. Finding the right model and replacement parts can be a challenge.
- Noise: Some users report that rear discharge toilets can be noisier during flushing compared to traditional toilets. The sound of water rushing through the wall-mounted tank can be a concern for some homeowners.
- Leaking: Over time, the seals and gaskets in rear discharge toilets may deteriorate, leading to potential leaks. Regular maintenance and periodic inspection of seals are essential to prevent water damage.
- Space Requirements: Wall-mounted toilets require sufficient wall space to accommodate the tank and drainage system. In small bathrooms or spaces with limited wall area, this can be a limitation.
Despite these potential issues, rear discharge toilets can be an excellent choice for certain bathroom layouts and designs, particularly in commercial settings and bathrooms where space-saving and cleanliness are priorities. Proper installation, regular maintenance, and careful consideration of your specific needs and constraints can help mitigate many of these potential problems.
Rough plumbing for rear discharge toilet; Procedure explained
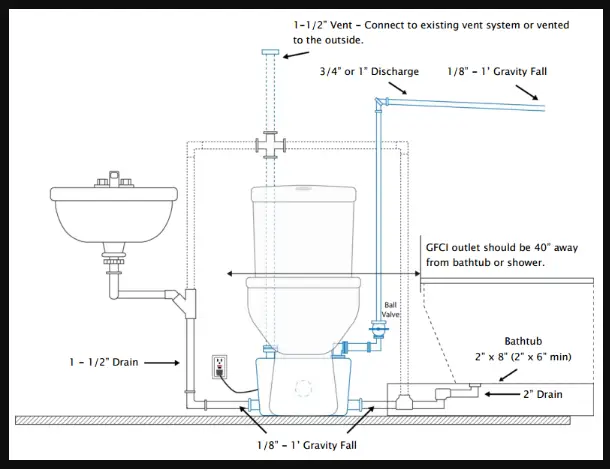
Rough plumbing for a rear discharge toilet involves installing the necessary plumbing components to prepare for the toilet’s fixture. Here are the steps to perform the rough plumbing for a rear discharge toilet:
Step 01 – Measure and Mark: Determine the rough-in dimensions for your rear discharge toilet, including the distance from the finished wall to the center of the drain pipe and the height of the toilet flange above the finished floor. Mark these measurements on the wall and floor as reference points.
Step 02 – Prepare the Drain Pipe: Cut an opening in the wall to accommodate the drain pipe, ensuring that the size and location match the toilet manufacturer’s specifications. Install an appropriate drainage elbow or flange, aligning it with your reference marks.
Step 03 – Install Drain and Vent Pipes: Connect the drain pipe to the rear discharge toilet flange using the proper fittings and secure it in place. Ensure that the pipe has a slight downward slope to facilitate proper drainage. Additionally, install a vent pipe that extends through the roof or connects to the existing plumbing vent system to prevent airlock issues.
Step 04 – Secure Water Supply: Determine the location for the water supply pipe, typically entering the wall near the toilet. Install a shut-off valve and supply line, leaving enough length to reach the toilet tank.
Step 05 – Secure the Toilet Flange: Ensure that the toilet flange is securely attached to the wall, aligning it with your reference marks for both height and horizontal position. Use suitable anchors or mounting hardware to secure the flange.
Step 06 – Conceal Plumbing: After verifying that all plumbing connections are secure and properly aligned, close the wall opening around the drain pipe and conceal the plumbing within the wall. Seal and insulate the wall properly to prevent moisture issues.
Step 03 – Test the Plumbing: Before installing the rear discharge toilet, perform a thorough plumbing test to check for leaks and ensure proper drainage. Run water through the drain and supply lines to confirm that everything is functiorough plumbing for rear discharge toiletning correctly.
Step 07 – Install the Toilet: Once the rough plumbing is complete and successfully tested, install the rear discharge toilet according to the manufacturer’s instructions for mounting and securing it to the flange.
Step 08 – Complete the Finish Plumbing: After installing the toilet, connect the water supply line to the tank, adjust the water level, and install the seat and other finishing touches as needed.
Please keep in mind that this is a general outline based on the information you provided. Plumbing work may require specific knowledge and compliance with local building codes, so it’s advisable to seek professional assistance or consultation when performing rough plumbing for a rear discharge toilet, especially if you lack experience in plumbing tasks.
Can’t Find AC Drain Pipe Outside; What Should You Do?
plumbinsight.com