
Dealing with Low Thermopile Voltage in Your Water Heater: Causes and Solutions Explained
Picture this: you step into the shower, ready for a nice, warm soak, but brrr! The water is ice-cold. It’s not fun, right? Well, it might be because of something called “low thermopile voltage” in your water heater.
Don’t worry; we’re here to break it down for you in simple terms and show you how to fix it. So, get ready to say goodbye to those chilly showers and hello to cosy, warm water!
Table of Contents
What’s Thermopile and How Does It Work?
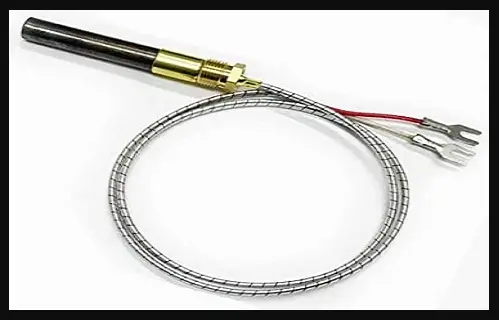
A thermopile is a tiny but mighty device in your water heater that generates electricity. It’s like a mini-power plant, creating the energy needed to keep your water hot.
How does it work?
When you light the pilot light, it heats up the thermopile. This heating action creates electricity, which powers the gas valve, keeping the pilot light on, and maintaining the warmth of your water.
Low thermopile voltage can lead to the pilot light going out, which is the last thing you want on a chilly morning. It’s like having the key to your hot water turned off.
Should I Buy A House With Galvanized Plumbing? All Explained
plumbinsight.com
What Causes Low Thermopile Voltage?
As we’ve discussed, there are many possible causes for this problem, and knowing all these possible causes will help you figure out what exactly is happening there.
Could it be a faulty thermopile?
Sometimes, yes. Just like any other part of your water heater, the thermopile can go bad over time. If the thermopile isn’t working correctly, it won’t generate enough voltage to keep the pilot light on. In this case, you’ll need to replace it.
Can windy weather cause low thermopile voltage?
Yes, it can. High winds are like the bullies of the water heater world. They can blow out the pilot light, which interrupts the voltage production.
If your water heater is outdoors or in a drafty area, winds can make the problem worse. To protect your water heater, consider installing vents or chimney caps to block those gusts.
What about open windows and doors?
Absolutely! Leaving windows and doors wide open can cause trouble for your thermopile. Cold drafts can chill the pilot light, reducing the voltage it generates. Make sure to keep your home sealed up tight when you’re trying to enjoy a hot shower.
How do you check the voltage on a water heater thermopile?
To test your thermopile, you’ll need a multi-meter, which is a simple and affordable tool that measures electrical voltage. You might already have one in your toolbox.
Here’s a step-by-step guide to testing your thermopile:
- Set up the multi-meter: Ensure your multi-meter is set to measure direct current (DC) in the millivolt (mV) range.
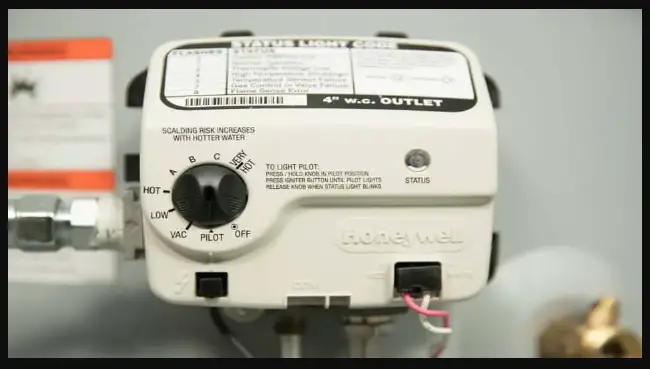
- Disconnect the thermopile wiring connector: This is usually attached to the gas control valve.
- Light the pilot: Follow the manufacturer’s instructions to light the pilot light.
- Measure the voltage: With your multi-meter, measure the voltage. A healthy thermopile should produce around 300 to 600 millivolts.
- Check the manual: Always consult your water heater’s manufacturer manual for specific voltage requirements.
Can You ProPress Soft Copper and M Copper? All Explained
plumbinsight.com
What if the voltage is too low?
If you measure less voltage than your water heater’s manual suggests, it’s a sign that your thermopile might be the issue. If the voltage is low, then replacing the thermopile will be the best solution, and here is how to do it on your own.
How to Replace a Faulty Thermopile?
Before you begin, remember to turn off the gas supply to ensure safety. If you’re uncomfortable with gas work, it’s best to call a professional. Here’s how to replace a faulty thermopile:
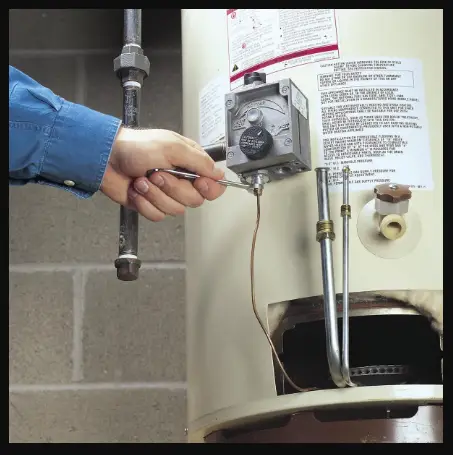
- Turn off the gas supply: Safety first! Make sure the gas supply is off before you start.
- Remove the protection cover: Take off the protective cover to access the thermopile.
- Disconnect ignitor and thermopile wires: Carefully detach the wires connected to the ignitor and thermopile.
- Remove the manifold and pilot tube: These are parts that house the thermopile. Unscrew and remove them carefully.
- Pay attention to the order: Keep a close eye on the order of wires and tubes as you remove them. You’ll need this information when reassembling.
- Remove the pilot assembly and thermopile wire: Take out the old thermopile and the associated wires.
- Insert the new thermopile wire: Gently and securely insert the new thermopile wire.
- Reconnect wires and tubes: Reattach the wires and tubes in the same order you removed them. Be careful not to bend or kink anything.
- Reinstall manifold components and thermal switch wiring: Put everything back where it belongs.
- Test for gas leaks: Once you’ve reassembled everything, it’s crucial to check for gas leaks. You can use a soap and water solution to detect any leaks, but if you’re not confident, don’t hesitate to call a professional.
Conclusion
In a nutshell, low thermopile voltage is the reason behind your cold showers. It can be caused by windy conditions, open windows and doors, or a faulty thermopile. You can test your thermopile with a multi-meter and replace it if necessary.
Safety is paramount when it comes to gas appliances. If you’re not comfortable working with gas or if you have any doubts, it’s always a wise choice to call in a professional. It’s better to be safe than sorry.
Could I have warranty coverage for professional repairs?
Absolutely! Many water heaters come with warranties that cover professional repairs. Check your warranty to see if you can save on the cost.
Closing Remarks
In the end, maintaining your water heater’s thermopile voltage is essential for a consistent supply of hot water. We hope this guide has shed light on the issue and given you the confidence to tackle it. Thanks for spending time with us, and if you have any questions or need professional referrals, feel free to reach out to us. Stay warm and enjoy those cozy hot showers!
Some related FAQs
What causes a thermopile to fail?
A thermopile contains a hot zone (the upper end) and a cold zone. Overheating, often due to a too-high pilot flame, causes the cold zone (lower end) to become excessively warm, leading to early thermopile failure. This imbalance in temperature is a common reason for thermopile issues in water heaters.
Can you clean a thermopile?
Yes, you can clean a thermopile. To do this, first, make sure to shut off the gas supply. Then, use a small stainless-steel brush and fine-grit sandpaper to carefully clean the thermopile. After cleaning, use your multimeter to measure the voltage again. If the voltage is still low, it may indicate that the thermopile is too damaged or worn and needs replacement.
What is the temperature of a thermopile in a water heater?
The temperature of a thermopile in a water heater can vary, but it typically operates at a temperature similar to that of the pilot flame. Pilot flames in water heaters usually burn at temperatures ranging from 1,000 to 2,000 degrees Fahrenheit (538 to 1093 degrees Celsius). The thermopile is designed to withstand these high temperatures and convert the heat into electrical voltage for controlling the gas valve.
Does thermopile control pilot light?
Yes, a thermopile plays a crucial role in controlling the pilot light in many gas appliances, including water heaters. When the pilot light is ignited, it generates heat, which the thermopile absorbs. The thermopile then converts this heat into electrical voltage. This voltage is used to maintain the gas valve’s open position, which, in turn, keeps the pilot light burning. So, in a way, the thermopile is responsible for controlling and ensuring the continuous operation of the pilot light.