
How To Fix Chamber Sensor Failure in Rheem Water Heaters?
Rheem water heaters are a dependable source of hot water for many households. However, even the most reliable appliances can develop problems over time, and one common issue that Rheem water heater owners may face is a chamber sensor failure.
In this comprehensive article, we’ll discuss what they are, how to identify their failure, why they can malfunction, and the potential safety concerns associated with such failures. We’ll also explore troubleshooting techniques and preventative measures to ensure your Rheem water heater stays in optimal condition.
Table of Contents
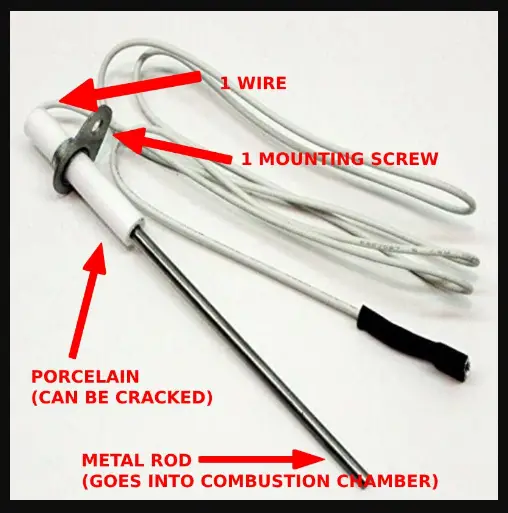
What is a Chamber Sensor?
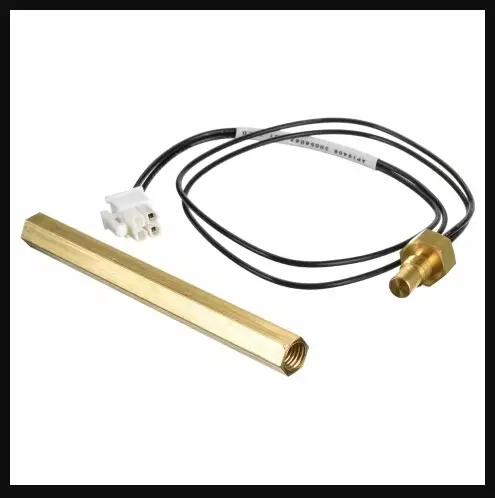
A chamber sensor, despite its technical-sounding name, is a critical component of a Rheem water heater. To put it simply, it’s like the water heater’s watchful eye on the flames. When you turn on your water heater, it ignites a flame (usually fueled by gas or electricity) to heat the water. The chamber sensor’s job is to make sure this flame is burning just right.
Think of it like cooking on a gas stove. When you turn on the gas burner, you want to see a steady blue flame. If the flame starts flickering or turns yellow, something is off, and you’d want to know about it, right? That’s exactly what the chamber sensor does inside your water heater.
What are the Symptoms of a Chamber Sensor Failure?

So, how can you tell if your chamber sensor is giving you trouble? Well, there are some pretty clear signs:
1. Flame Outages
If your water heater keeps going out, leaving you with sporadic hot water, it could be a chamber sensor issue. This happens because the sensor is supposed to keep an eye on the flame and make sure it stays lit. If it’s not doing its job, the flame may flicker and go out.
2. Flashing Error Codes
Many modern Rheem water heaters are equipped with clever error code systems. A chamber sensor failure often triggers one of these error codes to pop up on your water heater’s display. This is a clear hint that something’s not right.
3. Pilot Light Problems
If your water heater uses a pilot light, which is a small, continuous flame used to ignite the main burner, a failing chamber sensor can mess with this. Your pilot light might go out frequently, and that’s a surefire sign that your chamber sensor needs attention.
4. Inadequate Hot Water
Perhaps you’ve noticed that your water heater isn’t producing hot water as efficiently as it used to. The chamber sensor plays a role in ensuring the optimal performance of the burner. When it’s not working correctly, your water might not get as hot as you’d like.
Why Does a Chamber Sensor Fail?
Now, you might be wondering why a chamber sensor would fail in the first place. After all, it’s just a little sensor, right? Well, several factors can contribute to its malfunction:
1. Contaminants
Think of your water heater like a dusty closet you haven’t cleaned in a while. Dust and dirt can accumulate over time, clogging up the works. When these particles settle on the chamber sensor, it can’t do its job properly.
2. Corrosion
Moisture and condensation can wreak havoc on your water heater’s components. If the chamber sensor is exposed to too much humidity, it might start to corrode, making it unreliable.
3. Aging
Just like any other part of your water heater or any appliance, chamber sensors can wear out over time. After years of faithful service, they might simply reach the end of their useful life.
4. Manufacturer Defects
While it’s relatively rare, there’s always the possibility of a manufacturing defect. A sensor could be faulty from the start, and these issues might not become apparent until some time has passed.
How To Fix Broken PVC Pipe In Concrete? The Best Guide Ever
plumbinsight.com
What are the Safety Risks Associated with a Chamber Sensor Failure?
Now, let’s talk about something really important – safety. A failing chamber sensor can lead to several safety risks that you definitely want to avoid.
1. Carbon Monoxide Leaks: The chamber sensor is responsible for monitoring the combustion process. If it fails, there’s a risk that your water heater could produce carbon monoxide, a colorless, odorless gas that can be deadly if inhaled. A properly functioning chamber sensor helps prevent this dangerous situation.
2. Fire Hazards: When a chamber sensor isn’t working as it should, it can’t control the ignition process properly. This can lead to uncontrolled flames, increasing the risk of a fire breaking out around your water heater.
3. Explosions: In extreme cases, a malfunctioning chamber sensor can cause a buildup of gas, which could result in an explosion – an extremely rare but highly dangerous situation.
In essence, your chamber sensor is like the guard dog that ensures your water heater is playing safe. When it’s not working, it’s like having no guard dog at all – risky and unpredictable.
How to Troubleshoot a Chamber Sensor Failure?
If you suspect that your chamber sensor is giving you trouble, there are some steps you can take to troubleshoot the issue.
However, remember that safety is the top priority, so if you’re unsure or uncomfortable, it’s best to call in a professional. Here’s what you can do:
How to Identify a Chamber Sensor Failure?
Identifying a chamber sensor failure can be relatively simple. Look out for the symptoms we mentioned earlier. If your water heater frequently goes out, displays error codes, or has issues with its pilot light, there’s a good chance the chamber sensor is the culprit.
Additionally, you can consult your water heater’s manual or online resources for guidance on how to recognize a chamber sensor issue specific to your model.
How to Test a Chamber Sensor?
Testing a chamber sensor can be a bit technical, so it’s essential to approach this with caution. You’ll need a multimeter, a device that measures electrical resistance. Here’s how you can do it:
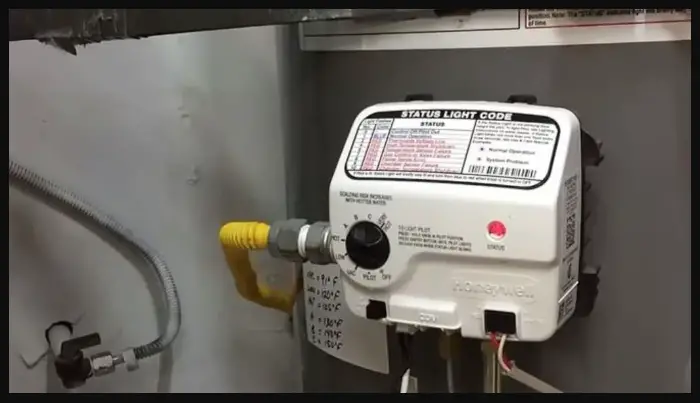
- Turn Off the Power: Safety first! Before testing anything, turn off the power to your water heater. For electric water heaters, this means shutting off the circuit breaker. For gas water heaters, turn the gas control valve to the “OFF” position.
- Locate the Sensor: The chamber sensor is typically located near the burner. Consult your water heater’s manual if you’re not sure where to find it.
- Remove the Sensor: Carefully disconnect the chamber sensor from its wiring. This will likely involve removing a cover or panel.
- Set the Multimeter: Switch your multimeter to the “Ohm” setting. Ohms measure resistance, and this is what we want to test.
- Test the Sensor: Touch the multimeter’s probes to the sensor’s terminals. You should get a reading that falls within the range specified in your water heater’s manual. If the reading is outside this range, it’s a sign that the sensor is malfunctioning.
If you’re not comfortable with this process or don’t have the right tools, it’s best to seek professional help. Testing a chamber sensor should be done with the utmost care to prevent any mishaps or electrical issues.
How to Replace a Chamber Sensor?
When it comes to replacing a chamber sensor, it’s a task best left to the professionals. This isn’t just about taking out the old sensor and popping in a new one; it’s about ensuring that the replacement is done safely and correctly.
Contact a Rheem service provider or a qualified technician to handle the replacement process. They have the expertise and tools necessary to get the job done safely and efficiently.
How to Prevent Chamber Sensor Failure?
Prevention is always better than cure, right? So, how can you avoid chamber sensor failure in the first place?
How to Flush Your Water Heater?
Regularly flushing your water heater is a crucial maintenance task that can prevent many problems, including chamber sensor issues. Flushing helps get rid of sediment and mineral buildup that can stress the sensor and other components.
Here’s how to do it:
- Turn Off the Power: Just like when testing the sensor, turn off the power to your water heater.
- Attach a Hose: Connect a garden hose to the drain valve at the bottom of the water heater.
- Open the Valve: Open the drain valve and allow the water to flow out. This process will help flush out sediment and debris.
- Close the Valve: Once the water runs clear, close the valve, and then disconnect the hose.
- Turn the Power Back On: After completing the flushing, turn the power back on to your water heater.
Regularly flushing your water heater, at least once a year, can help maintain your water heater’s performance and extend the life of the chamber sensor.
How do you reset a Rheem water heater sensor?

To reset a Rheem water heater sensor, follow these steps:
- Turn off the power to the water heater. For electric models, switch off the circuit breaker. For gas models, turn the gas control valve to the “OFF” position.
- Wait for a few minutes, giving the sensor time to cool down.
- Turn the power back on. For electric heaters, switch the circuit breaker back on. For gas heaters, set the gas control valve to the desired temperature setting.
- The sensor will reset and begin its normal operation.
Remember, if you suspect a sensor issue, it’s always a good idea to consult your water heater’s manual or contact a professional technician for proper diagnosis and troubleshooting.
A Comprehensive Guide to Compression Shower Drains
plumbinsight.com
Conclusion
In conclusion, a chamber sensor failure in a Rheem water heater is not a minor issue to be ignored. It can lead to various problems, safety risks, and inconvenience. To ensure the optimal performance of your water heater and the safety of your household, it’s crucial to identify and address this problem promptly.
Regular maintenance, including flushing your water heater, inspecting for leaks, and ensuring the chamber sensor area is clean, is essential in preventing these issues. Additionally, choosing the right water heater based on your household’s hot water demands and available energy sources can go a long way in extending the life of your chamber sensor.
Remember, when it comes to testing or replacing the chamber sensor, it’s best to leave it to professional technicians who have the experience and tools to do it safely and effectively. Safety should always be the top priority when dealing with gas appliances.